

安全是在任何环境中运行的最重要考虑因素之一,使用开源软件是在不超出企业环境或家庭设置预算的情况下处理安全性的好方法。谈论安全概念很容易,但了解能够帮助你实现目标的工具又是另一回事。本教程解释了如何使用 Jenkins 和 Anchore 设置安全性。
运行 Kubernetes 的方法有很多。使用 Minikube,一个预先打包的虚拟机 (VM) 环境,专为本地测试而设计,可以降低运行环境的复杂性。
| 技术 | 它是什么? |
|---|---|
| Jenkins | 一个开源自动化服务器 |
| Anchore | 用于容器镜像的检查、分析和认证的中心化服务 |
| Minikube | VM 内的单节点 Kubernetes 集群 |
在本教程中,你将学习如何将 Jenkins 和 Anchore 添加到 Kubernetes,并配置一个扫描管道,用于新的容器镜像和注册表。
注意:为了在本教程中获得最佳性能,Minikube 至少需要四个 CPU。
基本要求
知识
- Docker(包括 Docker Hub 帐户)
- Minikube
- Jenkins
- Helm
- Kubectl
软件
- Minikube
- Helm
- Kubectl 客户端
- 本地安装的 Anchore CLI
设置环境
安装 Minikube,选择适合你环境的方式。如果你有足够的资源,我建议为你的 VM 提供比默认内存和 CPU 功率稍多的资源
$ minikube config set memory 8192
⚠️  These changes will take effect upon a minikube delete and then a minikube start
$ minikube config set cpus 4
⚠️  These changes will take effect upon a minikube delete and then a minikube start
如果你已经运行了 Minikube 实例,你必须在使用 minikube delete 命令继续之前删除它。
接下来,安装 Helm,标准的 Kubernetes 包管理器,选择适合你操作系统的方式。
现在你已准备好安装应用程序。
安装和配置 Anchore 和 Jenkins
首先,启动 Minikube 及其仪表板。
$ minikube start
?  minikube v1.1.0 on darwin (amd64)
?  Tip: Use 'minikube start -p <name>' to create a new cluster, or 'minikube delete' to delete this one.
?  Restarting existing virtualbox VM for "minikube" ...
⌛  Waiting for SSH access ...
?  Configuring environment for Kubernetes v1.14.2 on Docker 18.09.6
?  Relaunching Kubernetes v1.14.2 using kubeadm ...
⌛  Verifying: apiserver proxy etcd scheduler controller dns
?  Done! kubectl is now configured to use "minikube"

$ minikube dashboard
?  Enabling dashboard ...
?  Verifying dashboard health ...
?  Launching proxy ...
?  Verifying proxy health ...
?  Opening http://127.0.0.1:52646/api/v1/namespaces/kube-system/services/http:kubernetes-dashboard:/proxy/ in your default browser...
只要你保持连接到此终端会话,你就可以在 127.0.0.1:52646 访问 Minikube 的可视化仪表板。

创建命名空间并安装 Jenkins
下一步是启动并运行 Jenkins 构建环境。首先,确保你的存储配置为持久性,以便稍后可以重用它。在你安装 Helm 之前,设置 持久卷 的存储类,以便其安装在重启后仍然持久。
退出仪表板(使用 CTRL+C)或打开一个新终端来运行
$ minikube addons enable default-storageclass
✅  default-storageclass was successfully enabled
使用命名空间
我测试了很多不同的应用程序,我发现使用 Kubernetes 中的 命名空间 非常有帮助。将所有内容都放在默认命名空间中可能会使其过于拥挤,并使卸载 Helm 安装的应用程序变得困难。如果你为 Jenkins 坚持这样做,你可以通过运行 helm del --purge jenkins --namespace jenkins 然后 kubectl delete ns jenkins 来删除它。这比手动在长长的容器列表中搜索和挑选要容易得多。
安装 Helm
要使用 Kubernetes 的默认包管理器 Helm,请初始化一个环境并安装 Jenkins。
$ kubectl create ns jenkins
namespace "jenkins" created
$ helm init
helm init
Creating /Users/alleycat/.helm
Creating /Users/alleycat/.helm/repository
Creating /Users/alleycat/.helm/repository/cache
Creating /Users/alleycat/.helm/repository/local
Creating /Users/alleycat/.helm/plugins
Creating /Users/alleycat/.helm/starters
Creating /Users/alleycat/.helm/cache/archive
Creating /Users/alleycat/.helm/repository/repositories.yaml
Adding stable repo with URL: https://kubernetes-charts.storage.googleapis.com
Adding local repo with URL: http://127.0.0.1:8879/charts
$HELM_HOME has been configured at /Users/alleycat/.helm.

Tiller (the Helm server-side component) has been installed into your Kubernetes Cluster.

Please note: by default, Tiller is deployed with an insecure 'allow unauthenticated users' policy.
To prevent this, run `helm init` with the --tiller-tls-verify flag.
For more information on securing your installation see: https://docs.helm.sh/using_helm/#securing-your-helm-installation
$ helm install --name jenkins stable/jenkins --namespace jenkins
NAME:   jenkins
LAST DEPLOYED: Tue May 28 11:12:39 2019
NAMESPACE: jenkins
STATUS: DEPLOYED

RESOURCES:
==> v1/ConfigMap
NAME           DATA  AGE
jenkins        5     0s
jenkins-tests  1     0s

==> v1/Deployment
NAME     READY  UP-TO-DATE  AVAILABLE  AGE
jenkins  0/1    1           0          0s

==> v1/PersistentVolumeClaim
NAME     STATUS   VOLUME    CAPACITY  ACCESS MODES  STORAGECLASS  AGE
jenkins  Pending  standard  0s

==> v1/Pod(related)
NAME                      READY  STATUS   RESTARTS  AGE
jenkins-7565554b8f-cvhbd  0/1    Pending  0         0s

==> v1/Role
NAME                     AGE
jenkins-schedule-agents  0s

==> v1/RoleBinding
NAME                     AGE
jenkins-schedule-agents  0s

==> v1/Secret
NAME     TYPE    DATA  AGE
jenkins  Opaque  2     0s

==> v1/Service
NAME           TYPE          CLUSTER-IP    EXTERNAL-IP  PORT(S)         AGE
jenkins        LoadBalancer  10.96.90.0    <pending>    8080:32015/TCP  0s
jenkins-agent  ClusterIP     10.103.85.49  <none>       50000/TCP       0s

==> v1/ServiceAccount
NAME     SECRETS  AGE
jenkins  1        0s


NOTES:
1. Get your 'admin' user password by running:
  printf $(kubectl get secret --namespace jenkins jenkins -o jsonpath="{.data.jenkins-admin-password}" | base64 --decode);echo
2. Get the Jenkins URL to visit by running these commands in the same shell:
  NOTE: It may take a few minutes for the LoadBalancer IP to be available.
        You can watch the status of by running 'kubectl get svc --namespace jenkins -w jenkins'
  export SERVICE_IP=$(kubectl get svc --namespace jenkins jenkins --template "{{ range (index .status.loadBalancer.ingress 0) }}{{ . }}{{ end }}")
  echo http://$SERVICE_IP:8080/login

3. Login with the password from step 1 and the username: admin


For more information on running Jenkins on Kubernetes, visit:
https://cloud.google.com/solutions/jenkins-on-container-engine
注意上面以 printf 开头的 Bash 单行代码;它允许你查询 Jenkins 密码,并且在没有它的情况下,找到你的 默认 Jenkins 密码 可能具有挑战性。记下它并保存以备后用。
设置端口转发以登录 UI
现在你已经安装了 Minikube 和 Jenkins,登录以配置 Jenkins。你需要 Pod 名称进行端口转发
$ kubectl get pods --namespace jenkins
NAME                       READY     STATUS    RESTARTS   AGE
jenkins-7565554b8f-cvhbd   1/1       Running   0          9m
运行以下命令来设置端口转发(使用你的 Jenkins pod 名称,这将与我下面的名称不同)
# verify your pod name from the namespace named jenkins
kubectl get pods --namespace jenkins
NAME                       READY     STATUS    RESTARTS   AGE
jenkins-7565554b8f-cvhbd   1/1       Running   0          37m
# then forward it
$ kubectl port-forward jenkins-7565554b8f-cvhbd 8088:8080 -n jenkins
Forwarding from 127.0.0.1:8088 -> 8080
Forwarding from [::1]:8088 -> 8080
请注意,一旦你运行端口转发命令,你将需要在终端中使用多个选项卡。
保持此选项卡打开,以维护你的端口转发会话。
在你的首选浏览器中导航到 Jenkins,访问 localhost:8088。默认用户名是 admin,密码存储在 Kubernetes Secrets 中。使用 helm install jenkins 步骤末尾的命令
$ printf $(kubectl get secret --namespace jenkins jenkins -o jsonpath="{.data.jenkins-admin-password}" | base64 --decode);echo
Jfstacz2vy
登录后,UI 将显示 欢迎使用 Jenkins!

从这里开始,我们将必须为 Jenkins 安装一些插件,以使我们的管道正常工作。在主页上,选择左侧的 Manage Jenkins 。

然后选择 Manage Plugins

然后选择 Available
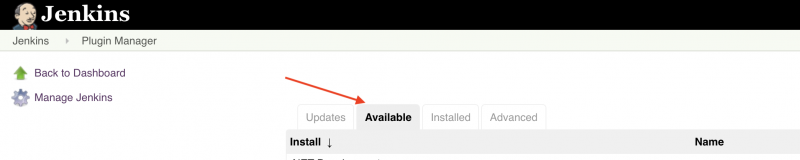
然后选中下面显示的这些插件旁边的复选框
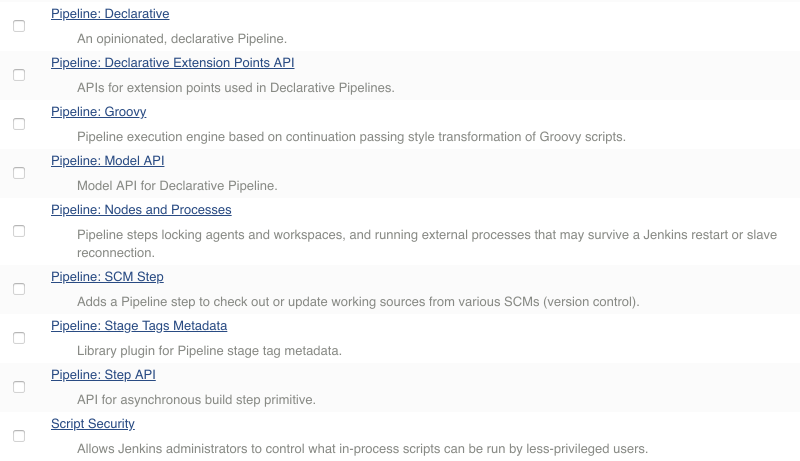
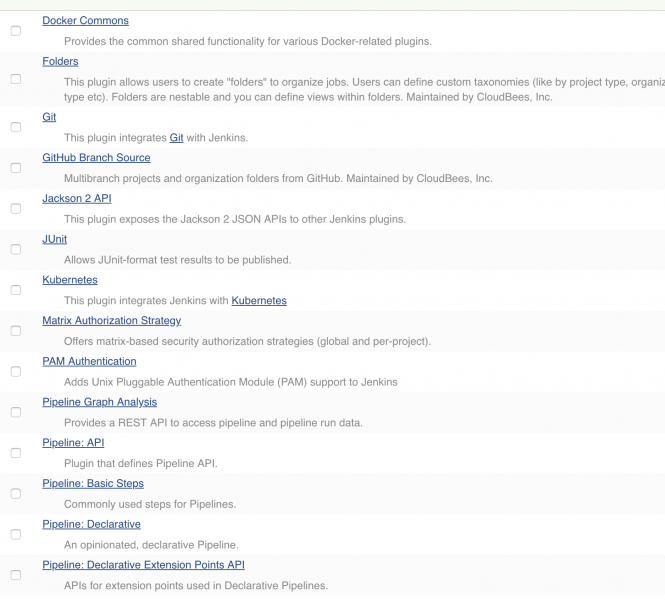
选中复选框后,滚动到页面底部并选择 Install without Restart。

部署 Anchore
Anchore Engine “是一个开源项目,提供用于容器镜像的检查、分析和认证的中心化服务。” 在 Minikube 中部署它,以对你的 Jenkins 管道进行一些安全检查。为 Helm 安装添加一个安全命名空间,然后运行安装
$ kubectl create ns security
namespace "security" created
$ helm install --name anchore-engine stable/anchore-engine --namespace security
NAME:   anchore-engine
LAST DEPLOYED: Wed May 29 12:22:25 2019
NAMESPACE: security
STATUS: DEPLOYED
## And a lot more output
使用此命令确认服务已启动并正在运行
kubectl run -i --tty anchore-cli --restart=Always --image anchore/engine-cli --env ANCHORE_CLI_USER=admin --env ANCHORE_CLI_PASS=${ANCHORE_CLI_PASS} --env ANCHORE_CLI_URL=http://anchore-engine-anchore-engine-api.security.svc.cluster.local:8228/v1/
If you don't see a command prompt, try pressing enter.
[anchore@anchore-cli-86d7fd9568-rmknw anchore-cli]$
如果你已登录到 Anchore 容器(类似于上面),则系统已在线。Anchore 的默认密码是 admin/foobar。键入 exit 以离开终端。
再次使用端口转发从你的主机系统访问 Anchore Engine API
$ kubectl get pods --namespace security
NAME                                                         READY     STATUS    RESTARTS   AGE
anchore-engine-anchore-engine-analyzer-7cf5958795-wtw69      1/1       Running   0          3m
anchore-engine-anchore-engine-api-5c4cdb5587-mxkd7           1/1       Running   0          3m
anchore-engine-anchore-engine-catalog-648fcf54fd-b8thl       1/1       Running   0          3m
anchore-engine-anchore-engine-policy-7b78dd57f4-5dwsx        1/1       Running   0          3m
anchore-engine-anchore-engine-simplequeue-859c989f99-5dwgf   1/1       Running   0          3m
anchore-engine-postgresql-844dfcc468-s92c5                   1/1       Running   0          3m
# Find the API pod name above and add it to the command below
$ kubectl port-forward anchore-engine-anchore-engine-api-5c4cdb5587-mxkd7 8228:8228 --namespace security
连接 Anchore 和 Jenkins
返回到 http://127.0.0.1:8088/ 的 Jenkins UI。在主菜单上,单击 Manage Jenkins > Manage Plugins。选择 Available 选项卡,然后向下滚动或搜索 Anchore Container Image Scanner Plugin。选中插件旁边的框,然后选择 Install without restart。

安装完成后,返回 Jenkins 中的主菜单,选择 Manage Jenkins,然后选择 Configure System。向下滚动到 Anchore Configuration。确认已选择 Engine Mode,并且输入了 URL,这是 Helm 安装的输出。添加用户名和密码(默认 admin/foobar)。为了进行调试,选中 Enable DEBUG logging。

现在插件已配置,你可以设置 Jenkins 管道来扫描你的容器构建。
Jenkins 管道和 Anchore 扫描
此设置的目的是能够即时检查容器镜像,以确保它们满足安全要求。为此,请使用 Anchore Engine 并授予其访问你的镜像的权限。在本示例中,它们位于 Docker Hub 上,但它们也可以位于 Quay 或 Anchore 支持的任何其他 容器注册表上。
为了在命令行上运行必要的命令,我们需要找到我们的 Anchore pod 名称,然后使用 kubectl exec SSH 进入它
$ kubectl get all
NAME                               READY     STATUS    RESTARTS   AGE
pod/anchore-cli-86d7fd9568-rmknw   1/1       Running   2          2d

NAME                 TYPE        CLUSTER-IP   EXTERNAL-IP   PORT(S)   AGE
service/kubernetes   ClusterIP   10.96.0.1    <none>        443/TCP   7d

NAME                          DESIRED   CURRENT   UP-TO-DATE   AVAILABLE   AGE
deployment.apps/anchore-cli   1         1         1            1           2d

NAME                                     DESIRED   CURRENT   READY     AGE
replicaset.apps/anchore-cli-86d7fd9568   1         1         1         2d
# Let’s connect to our anchore-cli pod
$ kubectl exec -it anchore-cli-86d7fd9568-rmknw -i -t -- bash
[anchore@anchore-cli-86d7fd9568-rmknw anchore-cli]$ anchore-cli --u admin  --p foobar  registry add index.docker.io <username> <password>
Registry: index.docker.io
User: jrepka
Type: docker_v2
Verify TLS: True
Created: 2019-05-14T22:37:59Z
Updated: 2019-05-14T22:37:59Z
Anchore Engine 现在已准备好与你的注册表一起工作。它有 几种方法 可以做到这一点,包括
- 分析镜像
- 检查镜像内容
- 扫描仓库
- 查看安全漏洞
将 Anchore Engine 指向一个镜像,以根据你的策略对其进行分析。对于我们的测试,我们将使用公开可用的 Cassandra 镜像
[anchore@anchore-cli-86d7fd9568-rmknw anchore-cli]$ anchore-cli --u admin  --p foobar   image add
docker.io/library/cassandra:latest

Image Digest: sha256:7f7afff84384e36593b085d62e087674029de9aced4482c7780f155d8ee55fad
Parent Digest: sha256:800084987d58c2a62daeea4662ecdd79fd4928d449279bd410ef7690ef482469
Analysis Status: not_analyzed
Image Type: docker
Analyzed At: None
Image ID: a34c036183d18527684cdb613fbb1c806c7e1bc26f6911dcc25e918aa7b093fc
Dockerfile Mode: None
Distro: None
Distro Version: None
Size: None
Architecture: None
Layer Count: None

Full Tag: docker.io/library/cassandra:latest
Tag Detected At: 2019-07-09T17:44:45Z
你还需要获取默认策略 ID 以针对你的管道进行测试。(在以后的文章中,我将深入探讨自定义策略和白名单规则。)
运行以下命令以获取策略 ID
[anchore@anchore-cli-86d7fd9568-rmknw anchore-cli]$ anchore-cli --u admin  --p foobar policy list

Policy ID                                   Active        Created                     Updated
2c53a13c-1765-11e8-82ef-23527761d060        True          2019-05-14T22:12:05Z        2019-05-14T22:12:05Z
现在你已经添加了注册表和你想要的镜像,你可以构建一个管道来持续扫描它。
扫描按以下顺序工作:构建、推送、扫描。 为了防止不符合安全要求的镜像进入生产环境,我建议对安全扫描采用分层方法:将容器镜像提升到单独的开发环境,并在其通过 Anchore Engine 的扫描后才将其提升到生产环境。
在我们配置自定义策略之前,我们无法做任何太令人兴奋的事情,因此我们将通过运行 Hello World 版本来确保扫描成功完成。以下是以 Groovy 编写的工作流示例
node {
   echo 'Hello World'
}
要运行此代码,请登录回 localhost:8088 的 Jenkins UI,选择 New Item,Pipeline,然后将此代码块放入 Pipeline Script 区域。

由于我们正在构建上面添加的整个 Cassandra 镜像,因此需要一些时间才能完成。在此期间,你将看到一个闪烁的红色图标。

它最终会完成并通过。这意味着我们已正确设置所有内容。
结束
如果你走到这一步,你将拥有一个运行 Minikube 配置,其中包含 Jenkins 和 Anchore Engine。你还拥有一个或多个托管在容器注册表服务上的镜像,以及 Jenkins 在镜像不符合默认策略时显示错误的方法。在下一篇文章中,我们将构建一个自定义管道,用于验证 Anchore Engine 设置的安全策略。
Anchore 也可用于扫描大规模 Amazon Elastic Container Registries (ECR),只要在 Jenkins 中正确配置凭据即可。
其他资源
对于一篇文章来说,信息量很大。如果你想了解更多详细信息,以下链接(包括我在 GitHub 上提供的本教程中的所有示例)可能会有所帮助
你希望我在下一个教程中构建哪些特定的管道?请在评论中告诉我。


2 条评论